
Hey guys and gals, I’m back! =)
Lately I’ve been deploying WordPress on Ubuntu servers with nginx quite often. It’s not complicated at all when you got the hang of it but can be a little bit overwhelming at first. So I decided to create a step-by-step tutorial for you guys.
First off we need Ubuntu server. I’m personally a big fan of Hetzner, been with them for quite a while. Not only their pricing very competitive, but also overall experience with them has been great so far. Use this link to get free $20 credits when you sign up.
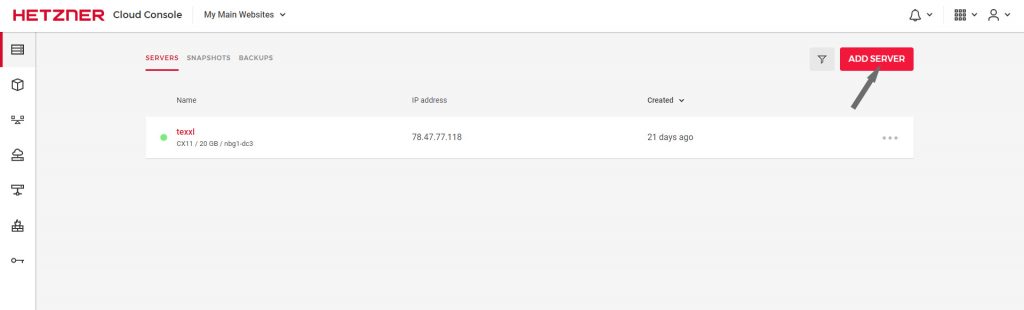
When you are at the Cloud control panel, create your first project and then start your Ubuntu 20 server. Leave everything as default (yes, CX11 serer for €3.01 is more than enough in 99% cases) on server installation screen.
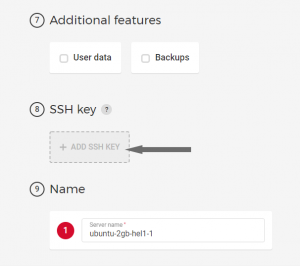 The only thing you should worry about is adding your SSH key.
If you don’t know how to generate SSH key, check out this article. You need to paste your public key here.
Click “Create & Buy Now” to deploy the server. Now when the server is up and running it’s time to connect, use ‘ssh root@YourServerIP’ command in your favourite command line (I personally use GitBash). If you are getting “IT IS POSSIBLE THAT SOMEONE IS DOING SOMETHING NASTY!” error, then just remove lines with this IP from ‘C:\Users\yourUser\.ssh\known_hosts’.
1. Install Nginx.
First we need to update our Advanced Package Tool (apt).
sudo apt update
sudo apt install nginx
The ‘sudo apt-get update’ command is used to download package information from all configured sources, it downloads the latest package information from the Internet.
2. Install PHP modules
It’s a good practice to install PHP modules before configuring NGINX.
sudo apt-get install -y php7.4-fpm php7.4-cli php7.4-curl php7.4-mysql php7.4-gd php7.4-xml php7.4-mbstring php7.4-zip php7.4-soap php7.4-dev
or version for perfectionists:
sudo apt install -y php7.4-{fpm,cli,curl,mysql,gd,xml,mbstring,zip,soap,dev}
‘-y’ tells package management tool to assume “yes” to any questions that pop-up during the installation process.
3. Let’s setup WordPress.
Public files to serve via nginx usually stored at /var/www. Create a directory named after your domain name in here.
cd /var/www
mkdir YourSiteName
cd YourSiteName
We shall first download the latest WordPress version, and then unpack it.
wget http://wordpress.org/latest.tar.gz
tar xzvf latest.tar.gz
rm latest.tar.gz
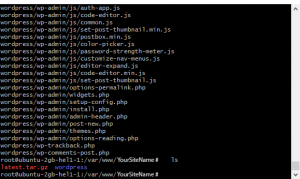 After that you’ll have 2 files in your directory. By ‘rm’ command we delete ‘latest.tar.gz’ as we don’t need it anymore. And now it’s time to configure WordPress. We need to create a copy of configuration file template:
cd wordpress
cp wp-config-sample.php wp-config.php
But before goin on and editing the file, please execute this command and copy the result.
curl -s https://api.wordpress.org/secret-key/1.1/salt/

Or simply open this url in a browser:
https://api.wordpress.org/secret-key/1.1/salt
These are WordPress SALTS – random strings of code containing eight variables that encrypt your login details. They’re added to your password to secure your WordPress login credentials further. This ensures your passwords are immune to brute-force attacks and similar hacking methods.
Copy them and proceed to editing ‘wp-config.php’ file with your favourite editor. I’m used to ‘Vi’.
vi wp-config.php
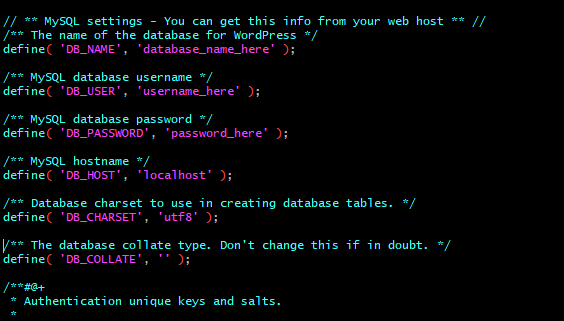
First, find the following lines and replace them with your copied SALTS:
define('AUTH_KEY',         'value generated by salt');
define('SECURE_AUTH_KEY',  'value generated by salt');
define('LOGGED_IN_KEY',    'value generated by salt');
define('NONCE_KEY',        'value generated by salt');
define('AUTH_SALT',        'value generated by salt');
define('SECURE_AUTH_SALT', 'value generated by salt');
define('LOGGED_IN_SALT',   'value generated by salt');
define('NONCE_SALT',       'value generated by salt');
If you are using VI editor, simply press ‘i’ in the location you want to edit. If ‘Ctr-V‘ doesn’t work, use mouse right button.
 And now the most important part. We haven’t yet created a database, so let’s save the data in a text file in order to establish one later. Create a text file on your computer and write down the following data. For database name I usually use my website name with ‘wp_’ prefix, for username ‘admin’ or whatever. Lastly create strong password. Save the text file and keep it somewhere handy on your pc, we’ll use it in a bit to crate the database for our WordPress site.
Since you have ‘wp-config.php‘ open – copy and paste database name, username and password into the appropriate fields. Close the file and save it (in VI editor it’s ESC and then type ‘:wq’).
And lastly, we must grant access to our WordPress folder so that NGINX has full access to it:
sudo chown -R www-data:www-data PATH_TO_YOUR_WORDPRESS_FOLDER
in most cases it’s something like this:
sudo chown -R www-data:www-data /var/www/YourWebsite/wordpress
And also give the folder read, write and execute permissions by:
sudo chmod -R 755 /var/www/YourWebsite/wordpress/
Here we simply assign the ownership of the WordPress folder to a user ‘www-data’ of the group with the identical name ‘www-data’. More detailed explanation on this.
And here’s some info about how ‘chown’ command works in Linux.
‘-R’ just means that process is done recursively and all inner directories are affected.
Ok, now that we have WordPress ready for installation…
4. Now it’s database turn.
I personally prefer MariDB. The core installation is fairly easy.
apt install mariadb-server
Then we should run a popular script for improving security of our MariaDB installation. Database security is no joke, you know:
mysql_secure_installation
I won’t go deep into explanations, but here is what you need to do for the following questions. In case you need more info on that click here. Otherwise just pick up the following options:
Enter current password for root (enter for none): {ENTER}
Set root password? [Y/n] N
Y for the rest of questions
Let’s test our installation with:
systemctl status mariadb
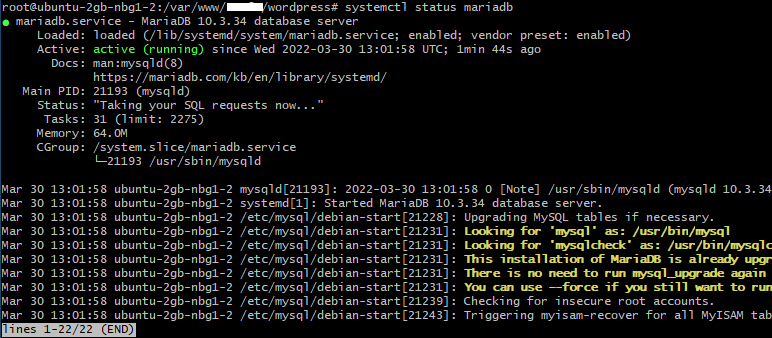 If you get ‘Active: active (running)‘ in green then everything went fine. By the way, if you see ‘lines 1-22/22 (END)‘ – you can get out of it by pressing “q”.
Next we need to create database, user and assign the user to the database.
First start MariaDB console by:
mariadb
Now remember we have written down our database name, username and password for future use? So now we need them:
CREATE DATABASE wp_yourwebsite;
CREATE USER admin IDENTIFIED BY 'your_password';
GRANT ALL PRIVILEGES ON wp_yourwebsite.* TO admin;
FLUSH PRIVILEGES;
EXIT;
You can find out more on these mySQL commands here.
5. Time to configure NGINX
In order to serve our website on this server we need to set up Nginx unit. For each of your website (yes, you can host multiple website on one NGINX server) there’s a separate config block. We can create a config file for our website with this command:
vi /etc/nginx/sites-available/YourWebsite.com.conf
‘vi’ command simply tells Linux to open the specified file in the following directory, and if there isn’t one – create it (which is our case). We need to set up some configurations here:
server {
    listen 80;
    listen [::]:80;
    root /var/www/YourWebsite.com/wordpress;
    index  index.php index.html index.htm;
    server_name  YourWebsite.com www.YourWebsite.com;

    client_max_body_size 100M;
    autoindex off;
    location / {
        try_files $uri $uri/ /index.php?$args;
    }

    location ~ \.php$ {
         include snippets/fastcgi-php.conf;
         fastcgi_pass unix:/var/run/php/php7.4-fpm.sock;
         fastcgi_param SCRIPT_FILENAME $document_root$fastcgi_script_name;
         include fastcgi_params;
    }
}
I’ll add explanations for this code above a bit later, for now you just can copy and paste it obviously changing YourWebsite.com to your specific one. Press {ESC} and type ‘:wq: if you are using vi editor in order to save and exit.
In order to transfer our configuration file from ‘Sites Available’ to ‘Sites Enabled’ we are using symlink:
sudo ln -s /etc/nginx/sites-available/YourWebsite.com.conf /etc/nginx/sites-enabled/YourWebsite.com.conf
Don’t be scared of ‘.com.conf’. 😀 It’s simply this way: ‘YourWebsite.com.conf’, i.e. configuration ‘.conf’ file for YourWebsite.com – this way NGINX understands that it’s a configuration file.
We need to make sure all our Nginx settings are OK and no errors show up:
nginx -t
If you see these 2 lines:
nginx: the configuration file /etc/nginx/nginx.conf syntax is ok
nginx: configuration file /etc/nginx/nginx.conf test is successful
is means everything went smoothly.
And finally in order for Nginx to process changes we need to restart its service:
nginx -s reload
or any of these:
sudo systemctl restart nginx.service
systemctl reload nginx
systemctl restart nginx
Now check your website in the browser, it should work fine now.
[Later I’ll add a part to show how to point a domain to the server]
6. Https and certificates
Last thing to do is make our site served via HTTPS protocol, in order to do that we also need to install appropriate certificates. We’ll do that easy way using Certbot:
apt install certbot python3-certbot-nginx
If you are obtaining the certificates for the first time, then the easiest would be simply:
certbot --nginx -d YourWebsite.com -d www.YourWebsite.com
Certbot will ask your for email and if you would like to redirect http traffic to https (I would highly suggest doing so) where to send security alerts to and then register certificates for you and even add the necessary data to your nginx .conf file. That was easy, wasn’t it?
And now if you are renewing the certificates:
certbot certonly --cert-name YourWebsite.com
It will prompt you a series of questions like:
How would you like to authenticate with the ACME CA?
1
Type ‘1’ to use the nginx certbot plugin. Then type in your email to receive urgent renewal end security notices. Next ‘A’ to agree with Terms of Service. And lastly ‘N’ for willingness to share your email address. It will then start obtaining certificates for you. When the process is complete you’ll see IMPORTANT NOTES:
 Congratulations! Your certificate and chain have been saved at:
   /etc/letsencrypt/live/YourWebsite.com/fullchain.pem
   Your key file has been saved at:
   /etc/letsencrypt/live/YourWebsite.com/privkey.pem
It’s self-explanatory and your certificate and key are saved in the aforementioned locations. In case you didn’t use certbot nginx plugin you will have to add settings to your nginx conf file manually:
server {
    root /var/www/YourWebsite.com/wordpress;
    index  index.php index.html index.htm;
    server_name  YourWebsite.com www.YourWebsite.com;

    client_max_body_size 100M;
    autoindex off;
    location / {
        try_files $uri $uri/ /index.php?$args;
    }

    location ~ \.php$ {
         include snippets/fastcgi-php.conf;
         fastcgi_pass unix:/var/run/php/php7.4-fpm.sock;
         fastcgi_param SCRIPT_FILENAME $document_root$fastcgi_script_name;
         include fastcgi_params;
    }

    listen [::]:443 ssl;
    listen 443 ssl;
    ssl_certificate /etc/letsencrypt/live/YourWebsite.com/fullchain.pem;
    ssl_certificate_key /etc/letsencrypt/live/YourWebsite.com/privkey.pem;
    include /etc/letsencrypt/options-ssl-nginx.conf;
    ssl_dhparam /etc/letsencrypt/ssl-dhparams.pem;


}
server {
    if ($host = www.YourWebsite.com) {
        return 301 https://$host$request_uri;
    }


    if ($host = YourWebsite.com) {
        return 301 https://$host$request_uri;
    }


    listen 80;
    listen [::]:80;
    server_name  YourWebsite.com www.YourWebsite.com;
    return 404;
}
nginx -s reload
7. Automatically Renew Let’s Encrypt Certificates
Let’s Encrypt certificates expire after 90 days. We encourage you to renew your certificates automatically. Here we add a cron job to an existing crontab file to do this.
Open the crontab file.
crontab -e
Add the certbot command to run daily. In this example, we run the command every day at noon. The command checks to see if the certificate on the server will expire within the next 30 days, and renews it if so. The –quiet directive tells certbot not to generate output.
0 12 * * * /usr/bin/certbot renew --quiet
Save and close the file. All installed certificates will be automatically renewed and reloaded.
Or you can also do it this way:
sudo systemctl status certbot.timer
To test if the automatic renewal is set, we can use dry-run mode:
sudo certbot renew --dry-run
If everything went fine then we are all set!